Hexo 博客搭建、进阶配置指南

作为一个 web 程序员,当然也想有自己的自留地
于是就研究起了搭建博客,来记录自己的成长
了解之后,发现 github + hexo 是个门槛很低的,效果很好的方式
hexo 基于 markdown,意味着不需要关心文章排版,也不需要学习编程
github 提供了免费空间、域名以及代码管理的工具,解决了服务器问题
2018-12-03 更新 章节 6.13 设置 RSS 订阅源
1. 准备工作
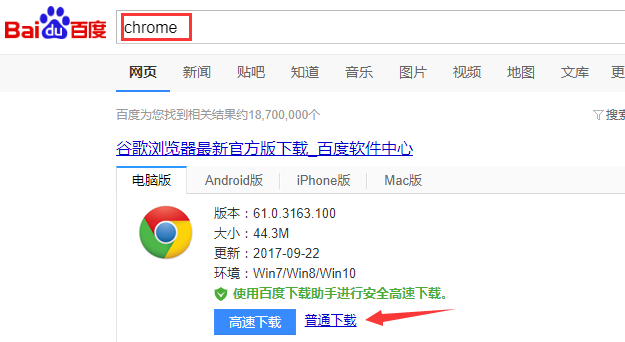
1.1 安装 chrome 浏览器,百度下载即可
1.2 注册一个 Github 账号
如果看不懂英语,可以点这个小按钮来全文翻译(失败的话可以多试几次,或使用其他翻译软件)
![]()
1.3 创建一个Repo
登录 Github(初次注册后会自动登录),点击右上角”+”,再点第一行 “新存储库”(New repository)
第一次要求验证邮箱,邮箱里会收到 Github 发来的邮件,点那个最长的链接就ok
存储库名称格式为 yourname.github.io。比如,我个人的 Github 账户用户名是 xiaweiss,所以,我的这个 Repo 的名称就是 xiaweiss.github.io
1.4 本地安装好 git 和 npm
下载自己系统对应的安装包,安装
windows 下载第一行的 msi 类型即可,位数按系统的位数即可,一般选64-bit
安装过程中,不用选择,一直点 next下一步即可
安装好之后,运行其他系统运行 terminal 命令行工具
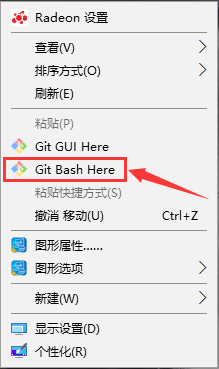
windows 系统,在桌面或任意文件夹内,右击,运行 git bush here
(下文的命令行中的命令,每行代表一个命令,行末必须按回车键Enter)
在命令行中输入
1 | git --version 回车键Enter |
如果看到版本号,则成功。否则重新安装
1.5 安装好 Atom
进入 atom编辑器 官网,下载安装它
启动 Atom 之后, 点击 Packages 安装插件
请搜索并安装以下 markdown 插件
markdown-writer
tool-bar
tool-bar-markdown-writer
markdown-scroll-sync
markdown-pdf
或者也可以使用其他你喜欢的 markdown 文件编辑工具
2. 本地搭建站点
2.1 安装 hexo
在命令行中继续输入
1 | npm config set registry https://registry.npm.taobao.org |
2.2 初始化你的本地站点
去 Github 把你的 Repo 的 git 地址拷贝出来。
我的是 https://github.com/xiaweiss/xiaweiss.github.io.git
你的是 https://github.com/yourname/yourname.github.io.git (其中,yourname 应该换乘你的 Github 用户名)
然后在 Terminal 面板里输入
1 | cd ~/Public (windows中 cd /d) |
这些完成之后,你就可以打开浏览器,在地址栏里输入: localhost:4000,在本地先看看网站是什么样子了。
3. 本地站点发布到 Github 上
3.1 修改 hexo 配置文件
关闭命令行,重新打开一个命令行
1 | cd /d/yourname.github.io |
在 Atom 的左侧面板中,选择 _config.yml 文件,找到 deploy 那一部分(末尾的79行)
1 | deploy: |
改成:
1 | deploy: |
Ctrl+S 保存
3.2 github 生成一个ssh-key配置
https://help.github.com/articles/generating-a-new-ssh-key-and-adding-it-to-the-ssh-agent/
打开命令行
1 | git config --global user.name "yourname" |
接着会出现几次提示,如下图箭头处,直接按回车Enter键即可
3.3 将ssh-key添加到 Github
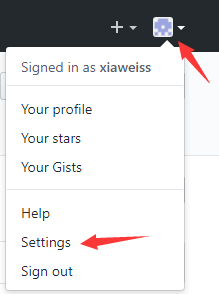
打开Github,点击右上角的头像,再点设置
命令行中继续输入
1 | cat ~/.ssh/id_rsa.pub |
然后可以看到一堆编码,见下图,把红框里的部分复制了。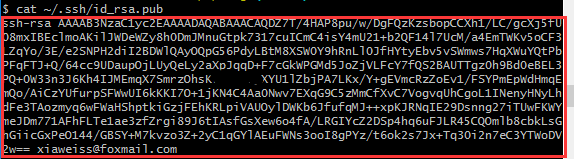
在用户设置侧栏中,单击 SSH and GPG Keys(SSH和GPG密钥),然后单击右上角绿色的 New SSH key(新的SSH密钥)
然后可以看到这个界面,Title标题随意填。key密钥里,把刚刚复制好的编码粘贴进去,然后点下面 Add SSH key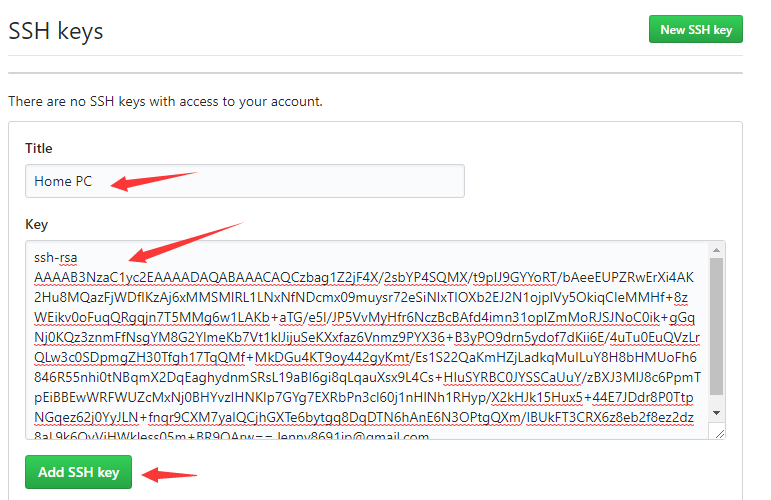
出现这个界面,表示成功了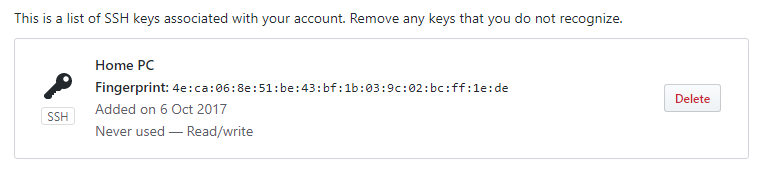
最后一步,命令行中输入,就可以发布到 Github 了
1 | hexo deploy |
打开 https://yourname.github.io 就可以看到博客了
4. 日常使用
打开命令行
1 | cd /d/yourname.github.io |
即可启动编辑器,并且打开项目目录
使用 md 后缀的 markdown 格式,来写文章。语法请参考 《献给写作者的 Markdown 新手指南》
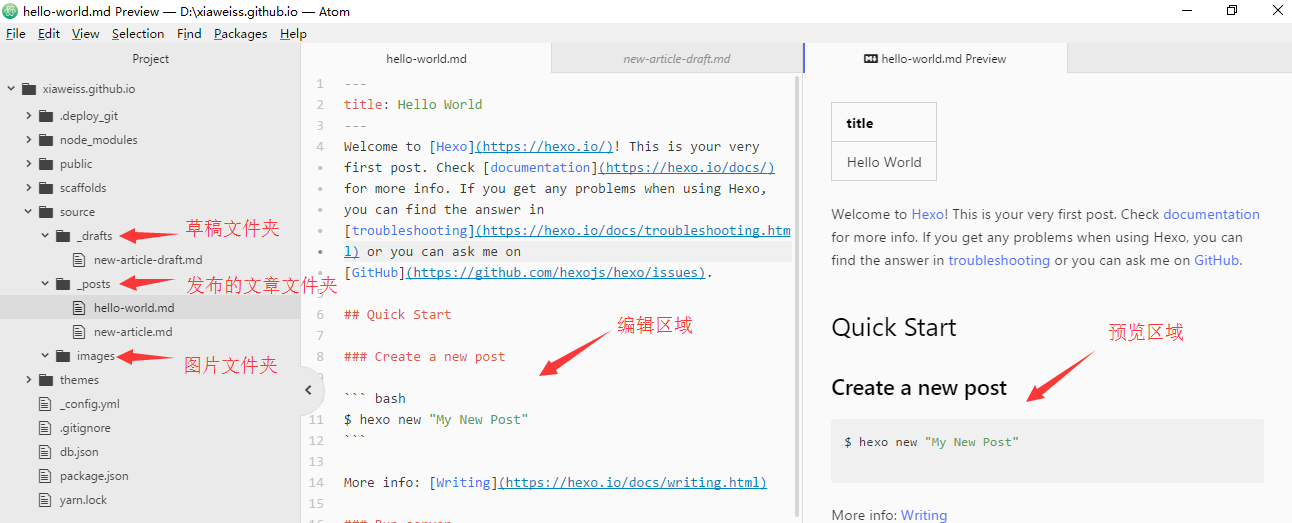
使用 atom 编辑器来 编辑md文件,打开md文件时 ctrl+shift+m 即可看到预览区域
_draft 文件夹用来存没写完的草稿
_posts 文件夹用来存要发布出去的文章
_images 文件夹用来存文章中的图片
以上文件夹下,直接放文章,不要放子文件夹
文件名命名格式推荐 20171008-file-name.md
文件名不要使用中文,中文不利于检索文件名
文章顶部 按模板的语法
1 | --- |
其中 date 是发布日期注意不要使用模板的 { date }写法,这种写法一旦标题改变或者数据文件 db.json 或 /public 丢失,发布日期会改变
多个标签或分类时,这样写
1 | tags: |
图片 可以用 语法来引入
1 | <!--more--> 表示预览区的分界线,主页面只会显示它之前的内容。 |
写完文章后,本地网站查看效果
1 | cd /d/yourname.github.io |
发布到 Github
1 | cd /d/yourname.github.io |
5. 备份本地代码 和 数据
5.1 坚果云备份
由于Github是开源的,备份到Github,别人容易下载拿走,考虑到私密性,推荐使用 坚果云 来自动备份
找到 yourname.github.io 文件夹右击,选择坚果云,选择同步到个人空间,即可

5.2 Github 备份
如果为了不引入其他工具,也可以使用 Github 来备份:
打开命令行
1 | cd /d/yourname.github.io |
每次备份操作,打开命令行:
1 | cd /d/yourname.github.io |
误删本地文件夹,从备份的代码恢复整个 yourname.github.io 文件夹:
1 | cd /d |
如果是在新的电脑恢复 整个 yourname.github.io 文件夹,
需要先重复步骤1 ~ 步骤2,并且其中以下步骤直接跳过,然后再执行上面命令
1.2 注册一个 Github 账号
1.3 创建一个Repo
2.2 初始化你的本地站点
6. 进阶优化配置
以下部分非新手向,只写要点,按需食用
6.1 版本控制
使用 git 来控制版本
为方便切换分支,
master分支添加 .gitignore 文件
master分支、source分支内容统一为
1 | .DS_Store |
6.2 主题更换
使用 NexT.Pisces 主题为例,详细中文文档
注意当一个repo包含其他repo时,使用命令 git submodule add 来安装并且分开管理,而不是 git clone,
1 | git submodule add https://github.com/iissnan/hexo-theme-next themes/next |
至于主题配置文件,可以保存一份副本到 themes 文件夹里提交到自己的仓库
注意切换主题后,如果显示不正常,运行 hexo clean 来清理数据
特别注意hexo clean同时会清除掉历史文章的发布日期,慎用!
clone 含有子repo 的项目后,子 repo 目录内没有内容,还需要执行下面两个命令来 clone 子repo
1 | git submodule init |
6.3 文章末尾添加评论区
目前由于国内审核机制,国内服务说不定哪天就关闭了。所以推荐国外的服务,比较稳定。使用国外的服务,需要代理上网访问国外,没有的用户则不显示评论区。
6.4 目录序号
主题会自动给文章的标题和子标题生成目录,并且加上序号
如果要自己写序号,不需要主题自带序号,修改主题配置文件 _config.yml 里的 toc 后面的 member 配置为
1 | 156行 number: false |
6.5 图片引用
推荐不使用图床,直接把统一图片存在本地文件夹
目前不支持 atom markdown预览 和 本地网站里同时正常预览图片
建议编辑时使用 
发布时用atom ctrl+f 统一把 ../ 替换为 / 即可
6.6 统计
阅读量统计可以使用 LeanCloud 计数,注意主题配置文件里有两处 LeanCloud,要配置leancloud_visitors
或者直接使用 不蒜子统计 即可,可同时实现阅读量统计、PV、UV功能。
个人建议,LeanCloud统计阅读量,不蒜子统计PV、UV
6.7 修改样式
next 主题使用 stylus 预编译样式语言
可以在 themes\next\source\css\_custom\custom.styl 文件里写自己的 stylus 样式
例如:首行缩进,添加如下代码:
1 | p |
6.8 显示更新日期
修改主题配置文件 _config.yml,找到 updated_at,修改为
1 | updated_at: true |
然后就会显示更新的日期了
如果需要手动设置,可以在文章的标签里加入 updated,如下
1 | --- |
6.9 底部添加备案信息、或者其他文字
在主题配置文件里找到 custom_text 这行,修改一下即可
1 | #custom_text: Hosted by <a target="_blank" href="https://pages.github.com">GitHub Pages</a> |
或者在主题配置文件里找到 copyright: 这行,修改为
1 | # If not defined, will be used `author` from Hexo main config. |
6.10 设置搜索服务
使用免费的 local search
npm 安装包
1 | npm install hexo-generator-searchdb --save |
next 主题配置文件里,修改配置文件
top_n_per_article 指正文的搜索结果,显示几条。 -1 代表全部显示
1 | local_search: |
6.11 添加分类、标签页
但以上设置会导致多出2个文件夹,而且以后不会在里面放其他文件,所以我个人推荐这样设置
在 source 目录下:
新建 文件 categories.md:里面写
1 | --- |
新建 文件 tags.md:里面写
1 | --- |
然后修改主题配置文件,menu设置里的 categories、tags
1 | menu: |
6.12 设置滚动
主题配置文件里
1 | scroll_to_more: true |
表示从主页进去文章后,直接自动滚动到文章中 more 标签的位置,可以看到网址里多了#more
如果需要去掉,设置为false即可
1 | save_scroll: false |
表示在本地存储阅读的进度(滚动到的位置),刷新或再次打开页面时,可以接着读。
建议打开这个功能,设置为true即可
6.13 设置 RSS 订阅源
安装依赖
1 | npm install hexo-generator-feed |
项目配置文件里添加配置
1 | # RSS |
主题配置文件里找到 rss 配置,设置为
1 | rss: /atom.xml |
rss 阅读器推荐使用 inoreader
7. 界面美化
7.1 右下角 live2d 小人
下面是我目前旧版2.1.5的使用方式,最新版请参考hexo-helper-live2d 中文文档
旧版配置方式:
安装
1 | cd yourname.github.io |
在 yourname.github.io 的 hexo 配置文件 _config.yml 里添加配置项
1 | # Live2D |
我自己使用的是 koharu,如果需要其他的,改为相应的名字即可
旧版所有小人请看作者大大博客 hexo live2d插件 2.0 !
接下来,在 next/layout/_layout.swig 文件里,找到 </body>,在它前面的行添加代码
像这样:
1 | {{ live2d() }} |
7.2 配置网站顶部背景颜色、二级标题字色
参照 6.1,添加配置
1 | .headband |
7.3 其他
界面的优化需要掌握一定的 css 知识,这里不再赘述
可以参考 千灵《Hexo 优化汇总》
以及我博客源码里 themes 文件夹下文件的的相关注释
概括来说
- 修改预设好的值,在
next/source/css/_variables/custom.styl添加变量即可
例如 base.styl 可以看到代码 $blue = #0684bd
要把所有预设好的蓝色改为白色,custom.styl 里添加 $red = #fff 即可
添加或修改 样式,可以在
next/source/css/_custom/custom.styl写入 css修改首页,添加 js,修改文字符号等,修改
next/layout/_layout.swig即可
文章页请修改next/layout/_macro/post.swig
8.高级设定
8.1 next 主题版本更新或回滚
进入 next 目录
1 | cd themes/next |
即可看到当前可用版本列表,使用下面命令即可切换到指定版本,如
1 | git checkout v5.1.4 |
切换过程中会有文件冲突
可以切换前执行 git stash,切换后执行 git stash pop,然后修改文件即可
或者使用软链接的方式,把修改的文件放在 next 文件夹外时,只需要修改文件,重新软链接即可
感谢阅读,最后附上博客源码
参考资料:
李笑来《使用 Hexo 为自己在 Github 上建一个静态 Blog 站点》
千灵《Hexo 优化汇总》
Hexo 官方文档
NexT 主题文档
图片来源:https://www.pixiv.net/member_illust.php?mode=medium&illust_id=40872946